- Enabling two-factor authentication
- Enable two-factor authentication via one-time passcodes
- Disable two-factor authentication via one-time passcodes
- Emergency disabling of two-factor authentication
2FA: Two-Factor Authentication Option for WordPress
1. The two-factor authentication option will help you strengthen your website's protection against hacking. It can be enabled here:
WordPress Admin Page → Settings → Security by CleanTalk → General Settings → the "Authentication and Logging in" category → set the "Two-factor authentication for chosen roles" option to "On" or "Only for new devices".
The email address of the site administrator who enables this option will be used to activate it.

- On means that the option will work every time you log in to the site.
- Only for new devices means that the option will work in those cases when you log in from a new device (other desktops, laptops, mobile phones, tablets, etc.).
2. A modal window will appear to check if you can receive emails from your website.

3. Check your inbox to get the code. It will look like this:

Attention! If you have not received the email (and it has not ended up in your spam folder), you need to check your website's mail server settings, because it is the mail server that sends the emails with the codes, not CleanTalk's servers.
4. Once the code has been entered, you can select the roles for which 2FA will work. By default, the option only works for Administrators. Hold down the CTRL key to select multiple roles:

5. Click to save the plugin settings.
The next time you log in to the site as a user for whom 2FA is enabled, you will see a CleanTalk authorization window:

When you see such a window, that means your authorization code has been sent to your e-mail and you have 10 minutes to input it.
Enable two-factor authentication via one-time passcodes
After enabling CleanTalk 2FA, each user can switch it to authentication via one-time passcodes. There are two ways to use the app for 2FA one-time codes:
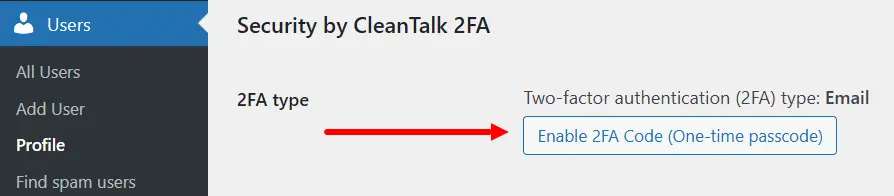
1. Go to your WordPress Dashboard → Profile Options
2. Scroll down to the Security by CleanTalk 2FA and press "Enable 2FA Code (One-time passcode)":
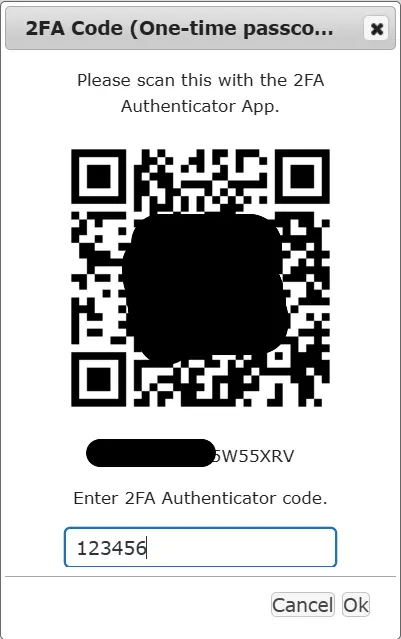
3. You should see the QR code and the manual activation code.

4. Install and launch the one-time password app for Android or iOS (these apps are provided as examples).
5. Press the "Begin" button:

6. Select "Scan a barcode". If you can't use your camera on your device then click the "Enter a provided key" line.

7. Focus the camera on the QR code that you see in step 3 of this guide. You should see the next screen on your mobile device with a new Authenticator record:

7A. Enter your account name and the manual activation code you have taken on step 3 of this guide to the respective fields. Set the type to "Time Based".

You should see the next screen on your mobile device with the new GA record.
8. Go back to step 3, enter the code from the app and press Ok:
9. 2FA via one-time passcodes is enabled for your WordPress account.
1. Go to your WordPress Dashboard → Profile Options
2. Scroll down to the CleanTalk Security 2FA and press "Enable 2FA Code (One-time passcode)":
3. You should see the QR-code and manual activation code.
4. Install a browser extension (this extension is provided as an example).
5. Press the extension button:

Perform the actions below, add your account name and the manual activation code from 3rd step to the "Secret" field :

6. Check if the GA record is successfully added:

7. Go back to step 3, enter the code from the app and press Ok:
8. 2FA via one-time passcodes is enabled for your WordPress account.
Using two-factor authentication via one-time passcodes
There are two ways to log in with a one-time passcode:
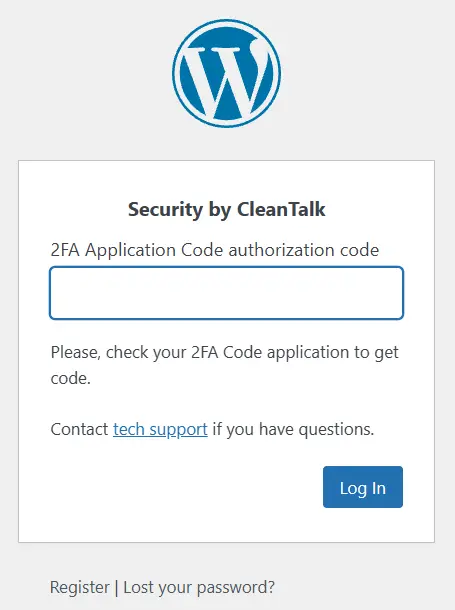
1. Proceed to your WordPress Dashboard login form and complete the first stage of authentication with your username and password.
2. The website will request a one-time passcode.
Launch your mobile app for one-time codes and find the code for your website (the app is provided as an example):
3. Enter the code you see and press "Log In". The one-time code is time-limited. If you receive an error message, try a new code.
4. If the previous step performed successfully, you will be redirected to your WordPress Dashboard.
1. Proceed to your WordPress Dashboard login form and complete the first stage of authentication with your username and password.
2. The website will request a one-time passcode.
Open the browser extension and copy the code for your website (the extension is provided as an example):
3. Enter the code you see and press "Log In". The one-time code is time-limited. If you receive an error message, try a new code.
4. If the previous step performed successfully, you will be redirected to your WordPress Dashboard.
Disable two-factor authentication via one-time passcodes
To disable 2FA perform the next steps:
1. Enter your WordPress Dashboard → Profile Options.
2. Scroll down to the Security by CleanTalk 2FA and press "Disable 2FA Code application authenticator":

3. 2FA via one-time passcodes is disabled.
Emergency disabling of two-factor authentication
If for any reason you are unable to complete the second stage of authentication, you can disable the two-factor authentication option via your CleanTalk dashboard:
1. Switch to your Security Dashboard: the "Services" menu → choose "Site Security". Direct link: https://cleantalk.org/my?cp_mode=security
2. Find your website and click the link "Settings" under its name.
3. Check the "Turn two factor authentication (2FA) off" option and click the button "Update". After refreshing the page, the checkbox for the option will be unchecked again - this is normal.

Next, wait a few minutes until the CleanTalk servers tell the CleanTalk plugin to disable the option.
Try to log into your website again.
If you haven't found the answer to your question, please, contact our support team:
https://cleantalk.org/my/support/open
It would also be interesting
- CleanTalk WordPress and Universal Security Plugins for websites | Description of all Security FeaturesFeatures of the CleanTalk WordPress Security and Uniforce Security Plugins Brute-force Protection Security...
- 2FA: Two-Factor Authentication for Your CleanTalk Dashboard2FA: Setting Up Two-Factor Authentication for CleanTalk Dashboard You can secure your CleanTalk...